Happy Mother's Day! This one goes out to all you artist moms struggling to balance your home and kids with your artist career. You can do it! :)


Happy Mother's Day! This one goes out to all you artist moms struggling to balance your home and kids with your artist career. You can do it! :)
 Here she is, my excuse for being so out of everything for almost half a year. She was born on April 3d, weighing 8lb 3.9oz and 20 inches tall.

She's a healthy and mostly well-behaved baby (minus last week, when my mother-in-law was visiting. Looks like my kids just automatically become hyper when grandparents are around!) My son had a pretty tough time the first two weeks but seems to be recovering from the shock. He likes to hug and kiss the baby and always runs to the rescue when she's crying :) (he even says, "Al rescate!" - Spanish for "to the rescue!" when he does that).

I'm somewhat overwhelmed and trying to keep things low key and slow for now. I would love to have a couple of weeks of just me and the baby. Nevertheless, things are picking up speed...I've had several commission inquiries, some Etsy sales, and I'm getting ready to teach more classes in the summer.
 For more information about prints, please visit our product info page.
 For additional information, please visit our product info page.
For more information about prints, please visit our product info page.
Read about this painting (including a step-by-step demo) on my blog.
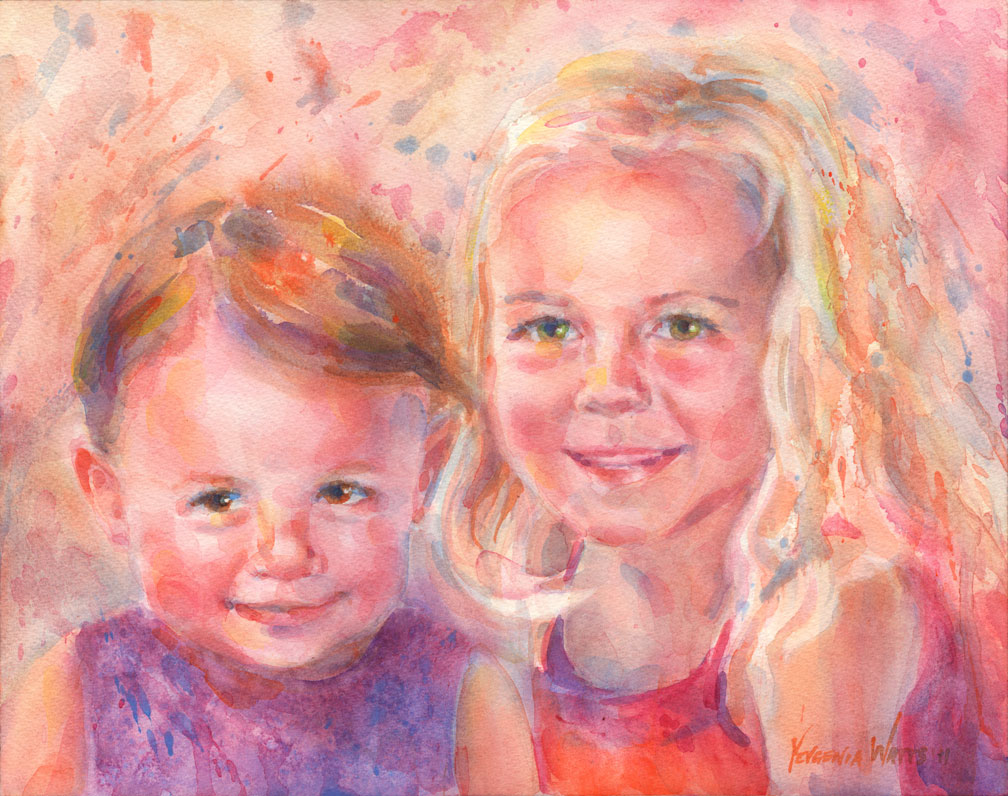
Here is another one of my Christmas commissions, two beautiful little girls who are cousins and live on the opposite sides of the U.S. I painted this in record time - less than a week. As it often happens with my group portraits, it is a composite of several reference images. I enjoyed working in a looser, more "impressionistic" manner, which is also part of the reason why I could finish the portrait in such a short time. The multiple-glaze smooth and "realistic" look requires that the bottom layer is bone dry before applying the next one.
If you are interested in a custom portrait, go here.
My new website design is up and running (thanks to my wonderful husband :)) but will probably be a work in progress for some time. I still need to find a good way for people to shop my greeting/note cards and some logical place to put my artwork that is not for sale (like the sketchbook section). Any ideas? What do you think about my website in general?
Sketch of a Clock
Just an announcement - I will be changing the look of my website over the next week or so. Please do not be alarmed if it looks horrible :P Please bear with me as I make these changes. Thanks!
Wedding portraits? Yes, I can say now I've done that, too :). And with the Valentine's day impending and all, I thought I'd share a recent wedding portrait I did for a wonderful new collector. This is one of my smallest portraits ever (rivaled only by the Icelandic Lady) and it gave me the opportunity to work with some brushes I normally never use - like #3 and 4 red sables. It also involved quite a bit of imagination, since this couple did not have high quality wedding photos, and development of a few ideas before we settled on this version.
Interested in having your own wedding or anniversary portrait? Here is how it works.
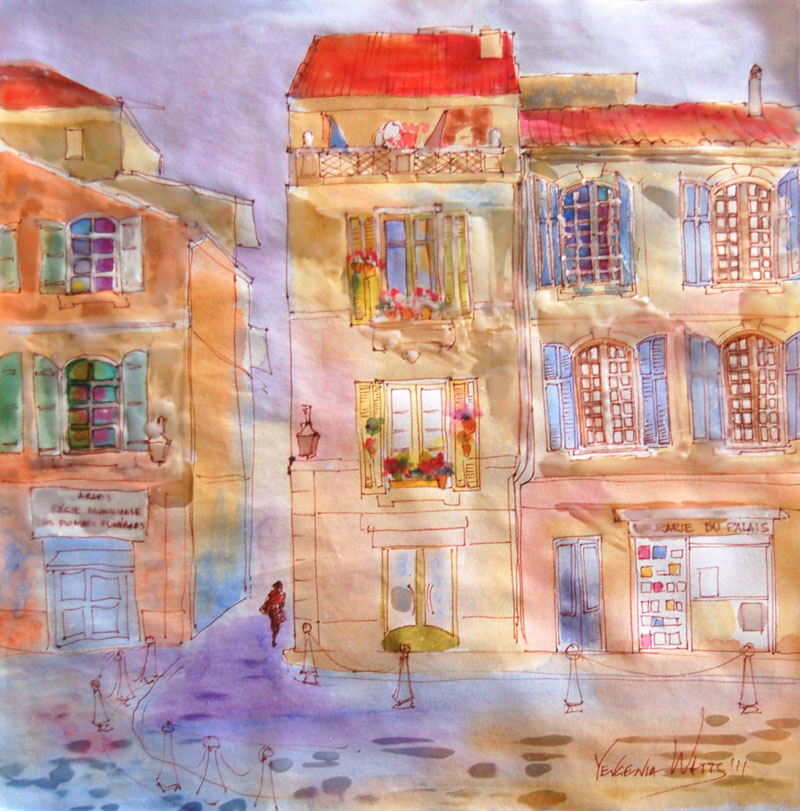
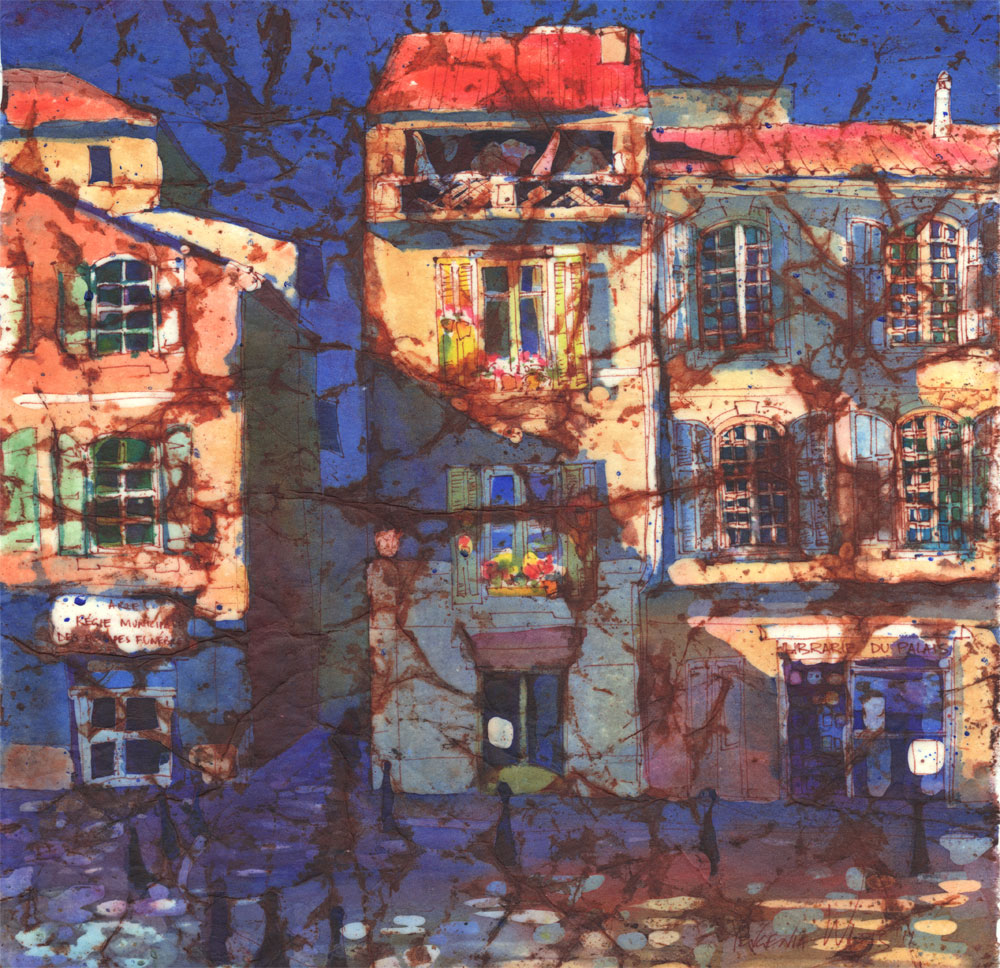
Watercolor batik is a painting technique that has been floating around for a while. I have painted on fabric before (not batik method strictly speaking), I knew the theory (basically, you use wax/paraffin in place of masking liquid and rice paper in place of regular watercolor paper) and I kept seeing paintings done in this technique here and there. Finally, months after bookmarking a demo by Kathie George on Artists Network, I decided to give it a try.
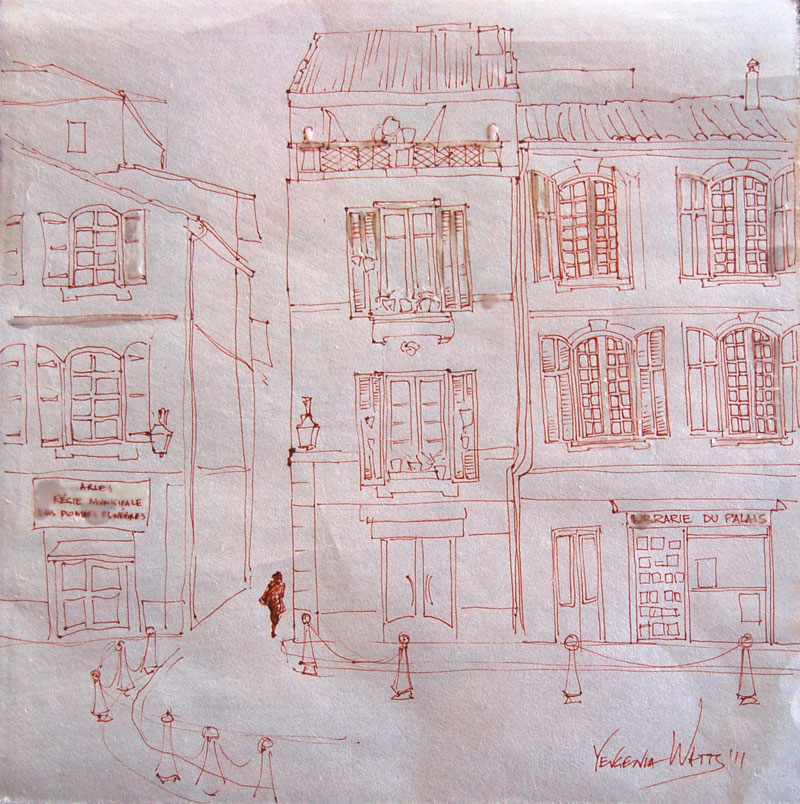
1. Make your drawing if you plan on having the lines. If you need to make a sketch first and then trace it onto the rice paper, be my guest. I drew straight on the rice paper - I think the uneven lines are not so horrible and actually add character.
Here, I already decided what my lightest lights are (a term meaning the areas of the artwork that will be the lightest in value. In watercolor, you typically leave them untouched, no paint at all). I masked them out with melted paraffin.
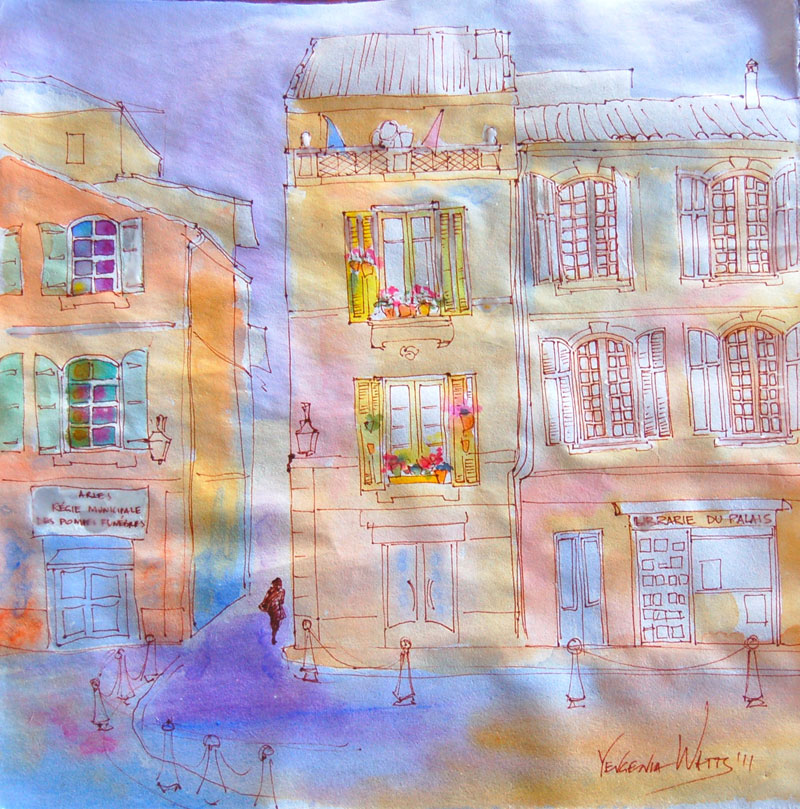
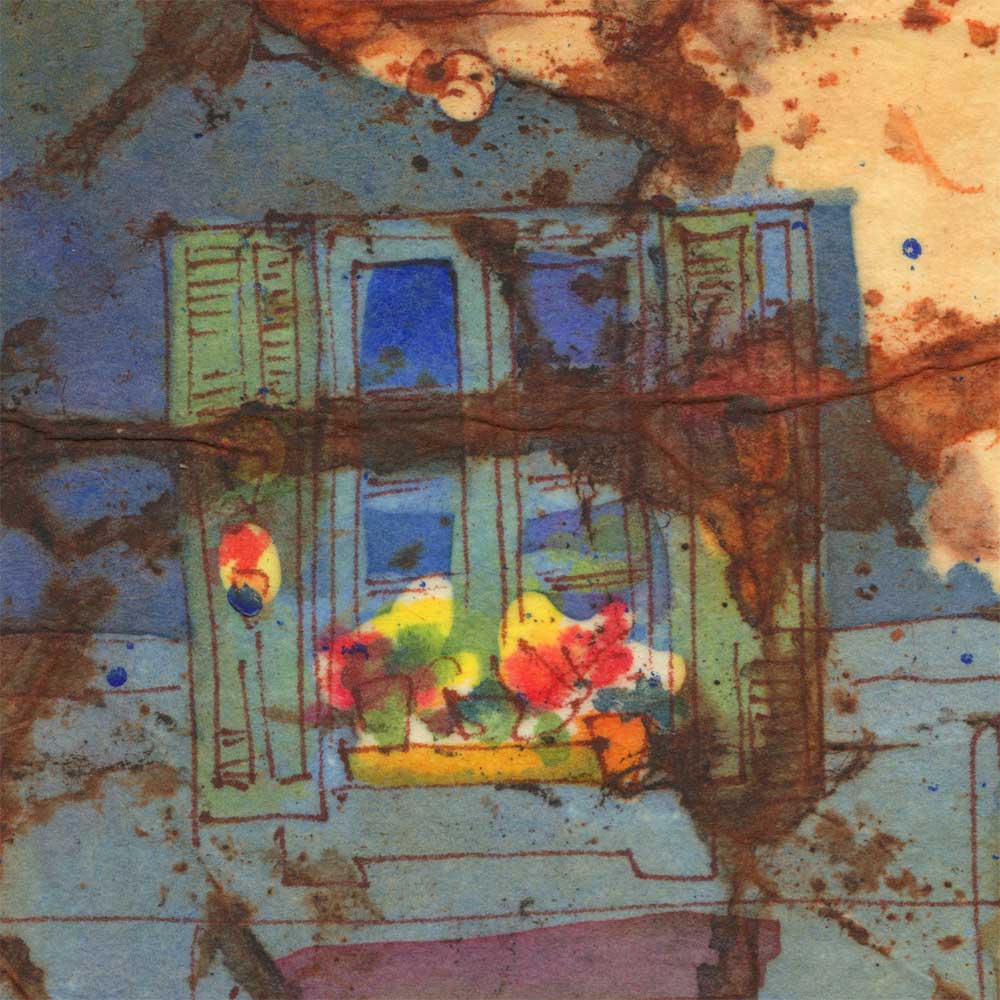
2. Apply first wash of color. You will be working from light to dark, so decide what your next lightest areas are and fill them in. Often, those are going to be your yellows, as they tend to be light in value. I also painted the bright colors of the flowers on the windowsills at this stage. I wanted to keep them fresh, so no more layers of paint on top.
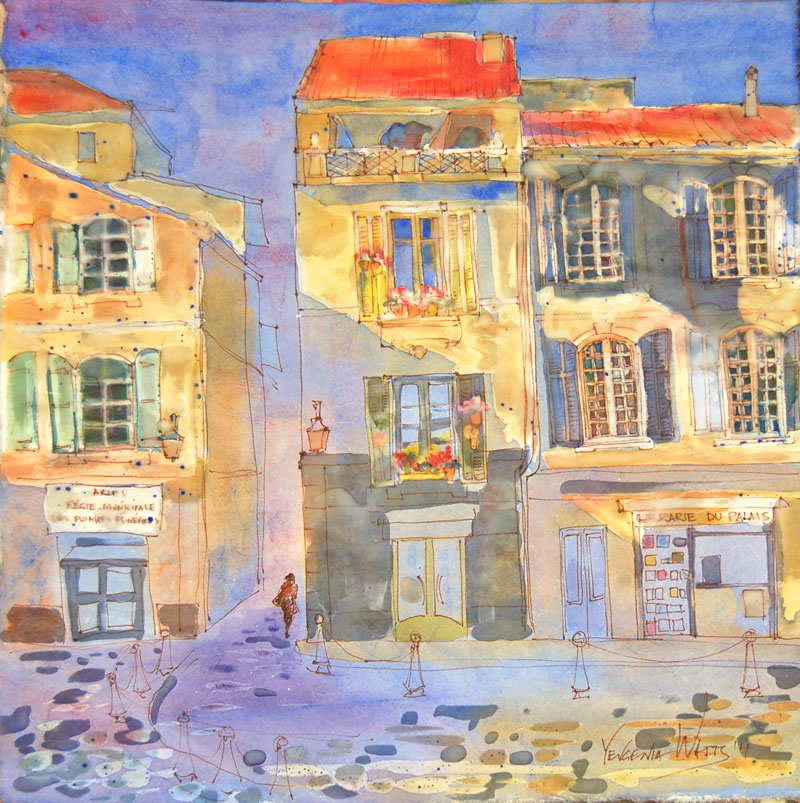
3. Apply more paraffin to areas that you want to keep the way they are. Paint middle values.
4. Same thing. Mask out the areas that you are happy with and move on with another layer of watercolor. Here I am about to add the darks.
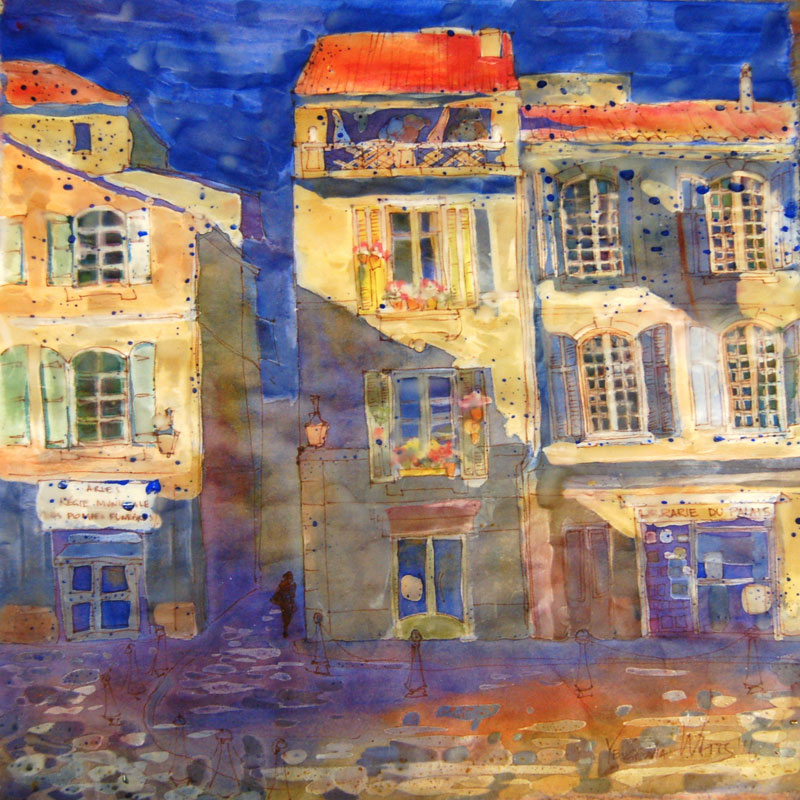
5. The image below is almost completely covered with paraffin.
6. More paraffin, more paint.
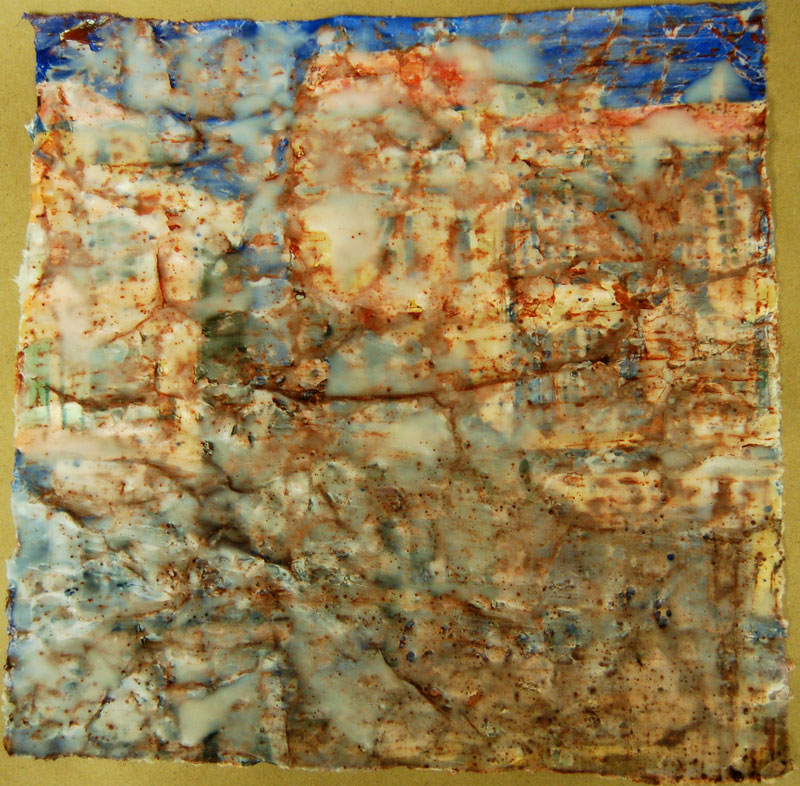
7. Once you're done, cover it all completely with paraffin and crinkle the paper. Apply a wash of color on top. I chose rusty orange to match the color of my ink lines. It will bleed into the cracks and bead on top of paraffin.
This step is optional. If you don't want the web pattern on top of the painting, feel free to skip it.
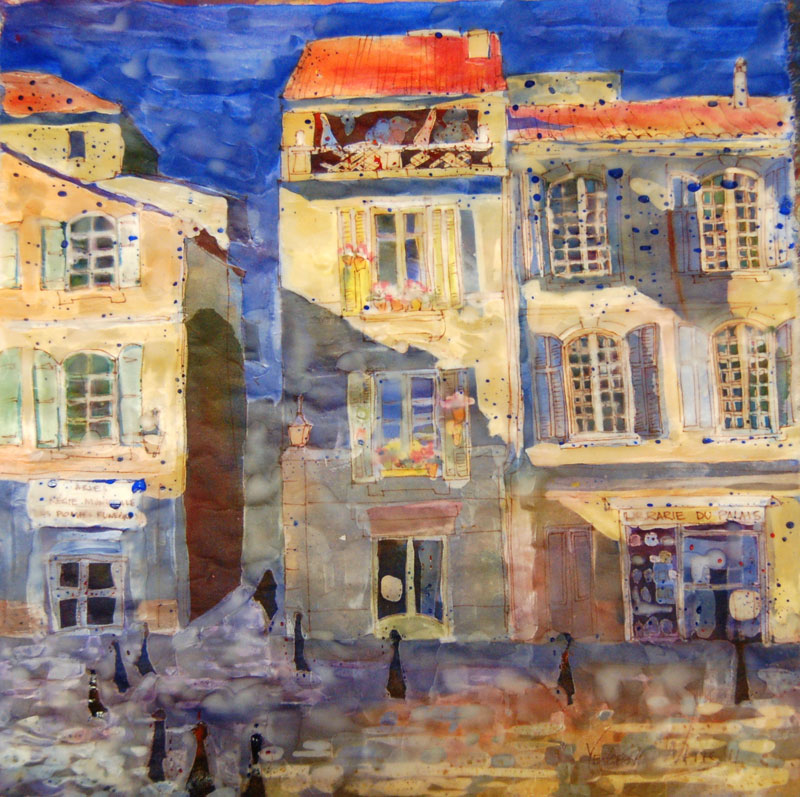
8. Newspapers and iron time. Place the painting between several layers of newspaper or tissue paper and keep ironing until all of the paraffin comes off. You will need to change the layers of paper to new ones in the process.
This is what it looked like after removing paraffin. I was fine with it for a day but then decided the white spots in the bottom third of the painting were just too distracting. When I tried painting them over, I couldn't: there was still some paraffin in the paper. One extra ironing removed it and I was able to tone the white spots down.
Here is the finished version:
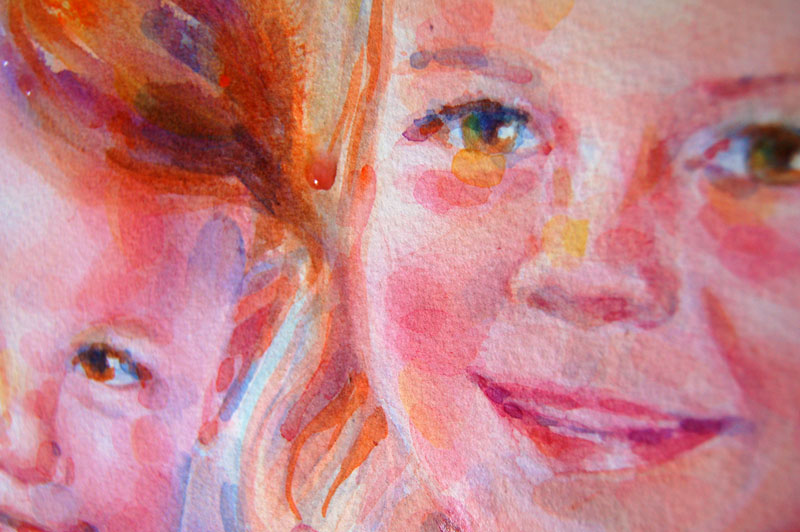
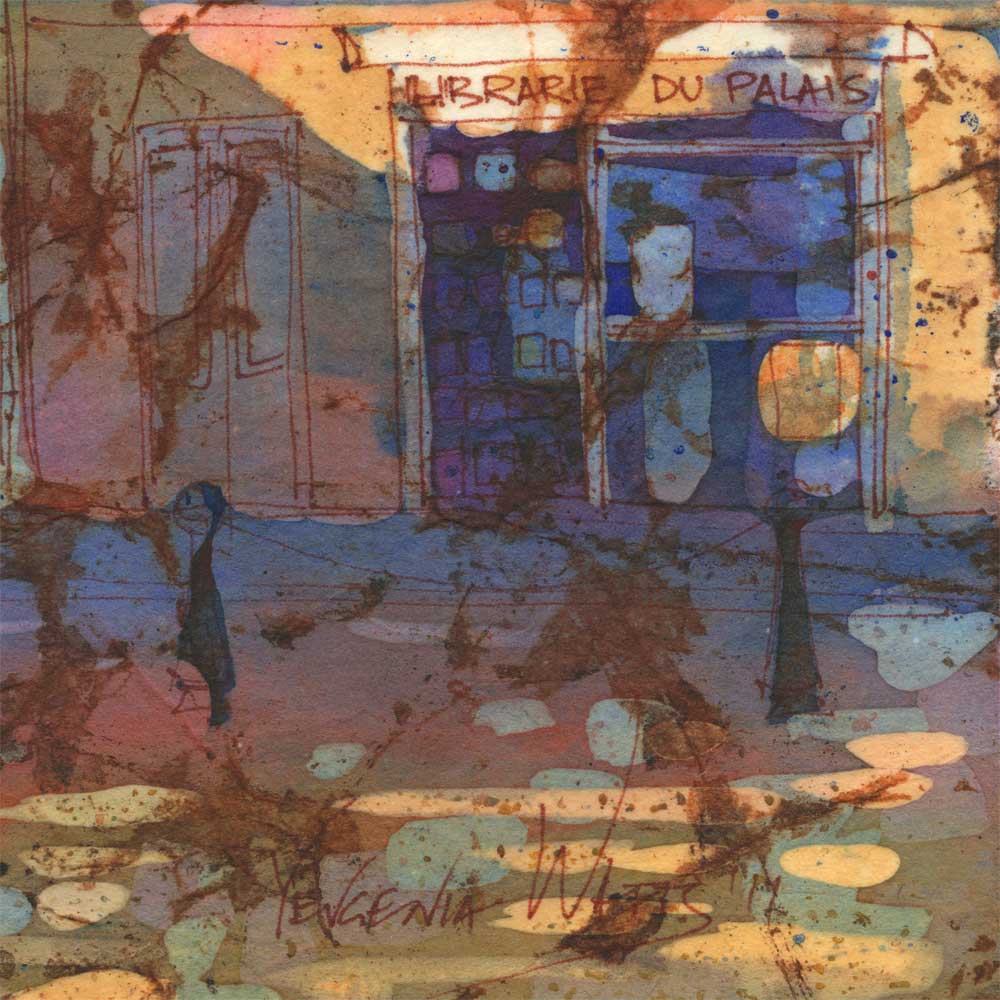
Detail views:
And a handy time lapse video: French Windows
Hope you enjoyed it! Questions? Suggestions? Comments?
Pre-Christmas time was very busy for me last year, mostly due to several portrait commissions. One of them was this sleeping baby boy. The unusual thing about this painting is how small it is - 6x6 inches. I don't even typically offer portraits this small. However, it was requested by a loyal collector and I decided to give it a try. It turned out fairly easy to work on (not too much fiddling with tiny brushes) and looked good when finished.
(If you are interested in a custom painting, go here.)
I am still sort of recuperating from that busy painting period... It allowed me to keep paying off my new Mac and buy some framing equipment. In the absence of art fairs or gallery shows, commissions are my main source of art-related income (that, and classes now). But painting only custom work can be much more exhausting than working on whatever you feel inspired to paint. Ever since Christmas, I found it extremely hard to motivate myself to do pretty much anything. Of course, there are things I have to do and I do them - but anything not-so-mandatory, like being creative and active, just falls through my fingers.

The good thing is, once I realized that what is happening is just a good old burnout (mixed in with pregnancy, sickness, and stay-at-home-mom stuff), I also became interested in getting myself out of it. I restarted work on a few more commissions and checked out art books at the library. I looked through the long-term and short-term goals that I wrote down last year and found out that, for example, some goals that I was skeptical about at the time, I have achieved relatively easily. I also bought The Right-Brain Business Plan: A Creative, Visual Map for Success by Jennifer Lee, after reading a comment about it on Artists Helping Artists (another good motivational resource). I received it in the mail today and I'm looking forward to ....something. Some kind of a breakthrough, upswing, burst of creative energy.
I'm also considering another painting challenge for myself. Maybe 100 landscapes. Or a month of daily paintings. A Portrait A Day didn't quite make it to over 200 portraits I had in mind - but it was a good project nevertheless. I learned a lot, I met new people, I grew. Something like that, maybe not quite as ambitious (especially since I'm about to have another baby) could be good.
How do you get yourself back on an upward curve? I'd love to hear some ideas :)
 As I promised, here are a couple of paintings by my adult watercolor painting students. Same setup with sunflowers on purple backdrop as the class demo I posted earlier. The color is probably quite a bit off in these shots - I didn't have the originals to compare to when I was editing the photos - but it should give you an idea of how talented these women really are. Pam (above) has never painted before but has an exceptional gift for bold and exciting color. The various purples and oranges in this painting were all mixed from a 6-color palette of cool and warm primaries. I am glad she decided to try painting.
Sharon (below) is a kindergarten teacher by day (a trade that must mean some superpowerful combination of patience and courage, not unlike watercolor painting ;)) and and a relentless painting experimenter by night. I think she will keep growing as an artist at very fast pace.

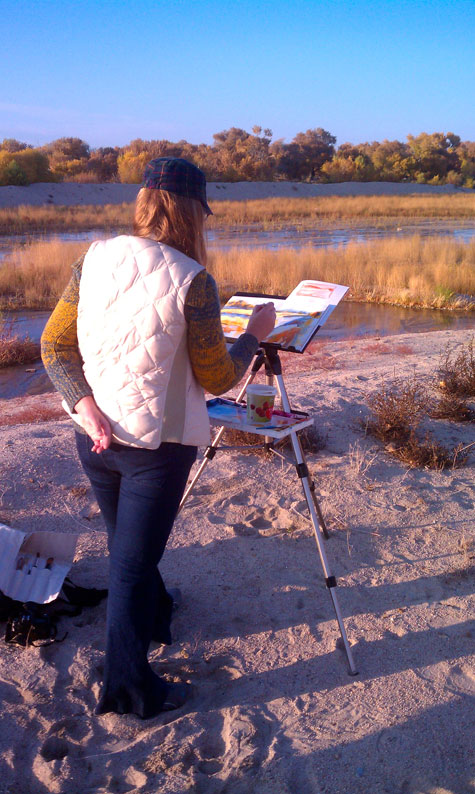
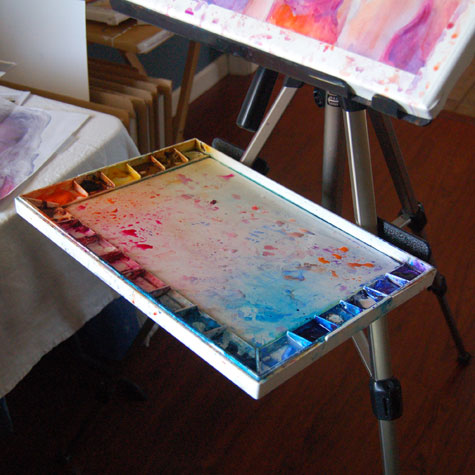
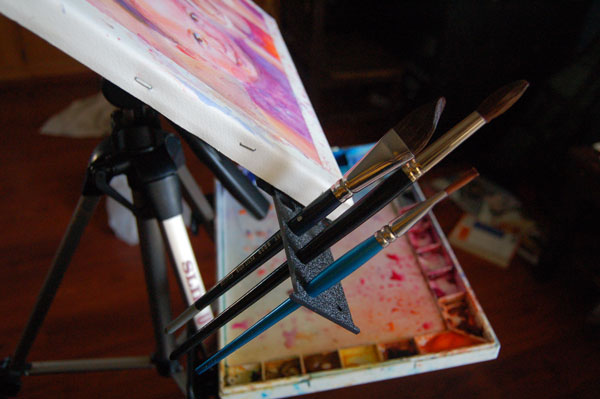
I have been using En Plein Air Pro Watercolor Easel for half a year now. I still love it almost as much as I did on the day it arrived but I have a bit more perspective on its advantages, disadvantages and uses. So here we go:
Pros:
Cons:
As with most portable setups, you have to watch out for that wind I just mentioned and weigh the tripod down. You also need to tighten the tripod mount screw quite well before attaching the easel to the tripod - otherwise, the board develops the tendency to slowly but surely rotate counterclockwise.
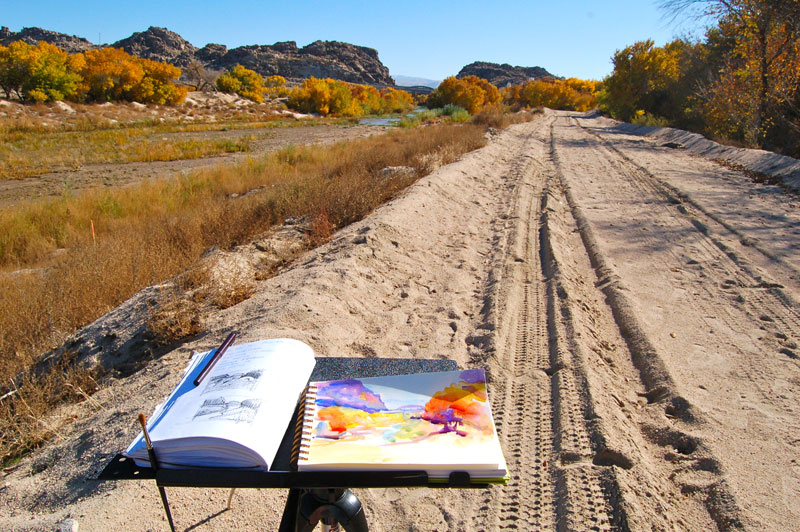
Because of the portability and flexibility, I use En Plein Air Pro more than my studio easel. I take it outside, I bring it to my classes, and I paint on it at home. If I didn't already have a large palette, I would likely get the Advanced palette shelf.
 Merry Christmas and Happy New Year from me and my growing
 belly family! In 2012, I wish you inspiration, motivation, and success! And lots and lots of amazing art that you had no idea you were capable of making :)
 This painting was done from life as a demo for my watercolor class. I loved the contrast of light, thick sunflower stems against the purple draping - hence the unusual cropping of the composition to show only the stems and the bottom few of the flowers. I'll be posting my students' versions of the same setup soon! :)


 For now, I'll just say that it was a very labor intensive, albeit interesting, process. Step-by-step tutorial is coming soon. Don't forget to check out all the other submissions to November Virtual Paintout!
Oh, and it smells nice...I used a stump of a very smelly white candle :)
 I love teaching art. That is my revelation of the year. I get all excited and happy talking about complimentary colors and granulating pigments (O Cobalt! O mysteriously French Ultramarine!) I get blissfully carried away and don't notice that it's time to go home.
My Intro to Watercolor classes started here in the California high desert (Town of Apple Valley, to be precise) in September. Since then, I've had two 6-week sessions, and four out of five students in the first session carried on to the second (the fifth student couldn't make it because of a surgery). It was great. I'm adding two more classes (intermediate watercolor and plein air) and, hopefully, at least one more location, in January. I'll have to take a break when the baby comes (due date is April 5) but I plan on continuing with the classes in summer.

Teaching art to somebody who is eager to learn is less like teaching and more like sharing something you really love. Most of my students are enthusiastic about painting (at least once they realize that watercolor isn't as horrible and scary as they've always heard) and, although not very young, absorb new knowledge like children. I find myself being excited about their little discoveries and revelations - because I remember discovering them and I myself keep learning new things every day, including from my students...

I had two concerns when I started the class. One, is that California High Desert is not exactly the center of civilization. Art, if it exists, hides from the daylight, heat, cold, and wind. Nothing happens here - with one exception, the Eclipse gallery. I was worried that my classes would just not generate enough interest and nobody would sign up. The second concern appeared when I realized that the majority of my students are somewhere around twice my age and might not take too well to being taught by someone who looks like she is, at best, fresh out of college. I think I saw some of that on the very first day of the class - but it didn't linger. At the end of the first session, I asked my students to fill out a course review and the papers I got back from them turned out to be a major confidence booster :). They loved the class and the instructor and were looking forward to the future classes.


Intro to Watercolor will restart on Friday, January 6, and the other two classes will begin on the day after. If you are interested in taking a class, click the "CLASSES" tab on the left. I will be adding information on the Intermediate and Plein Air classes soon.
 Moody, quite unlike most of my happy and colorful watercolor paintings, but I like it. We went to Niagara Falls back when we could go places, in September 2008. It was rainy and stormy and foggy and misty most of our stay - which, coming from California, we did not mind too much :)
The painting was born out of a couple of exercises and concepts from Powerful Watercolor Landscapes (which turned out to be a very well structured, clear, useful, and overall worthy addition to my library).
 I think it's about time I started posting sketches and paintings from my occasional trips to a plein-air figure drawing group. They meet every other Saturday and so far, I've only been able to attend four times. It's a drive for me..Over an hour drive, but it's worth it.
The group has all kinds of people in it: professional artists, amateurs, interior designers, graphic designers, students, an archeologist, an orthotics/prosthetics specialist, and, of course, architects. The sessions are usually three hours, without a whole lot of structure - other than the general idea that the shorter poses come first, the longer ones last. The models range from professionals to total first-timers (I still remember one of them doing a cart-wheel for a dynamic pose :)). The whole thing takes place outside, in the organizer's backyard. It's fun :)
These sketches are of Sue, a professional model who endured direct midday sun, ants, and an occasional lizard.

 I think painting wet-into-wet is relaxing...This is pretty much what watercolor is all about :)


 After a few months long break, I managed to create another painting for the Virtual Paintout project. It was one of those instant inspiration cases, which is a bit surprising given my reference image. Somehow, it really resonated with me - the high horizon, the birches, the grasses, the isolated little building...
Here is what it looks like on my living room wall:


The other news is that I'm 9.5 weeks pregnant and that I started teaching adult group watercolor classes. Being pregnant sucks, while teaching...I like it quite a lot so far :) I'm working on offering the basic class in other locations and I'm also developing an intermediate class.